I Take Good Photos on My Phone but When I Upload to Instagram They Appear Pixilated

The pandemic situation forced anybody to maintain social distance, and so for this, people near locked themselves in homes, but what kept them in affect with each other by sitting miles away from friends and family? The answer is 'Internet,' unlike social media platforms, commonly referred to as 'communication platforms.'
It is commonly said 'the more you interact, the more you lot learn.' This suits both humans to human and homo to application interaction. Something similar happened with Instagram. The more than people used it, and they realized that the photos await blurry.
The trouble that how to fix moving-picture show quality on Instagram remain unresolved, but the skillful news is that the article will provide amazing and implementable solutions.
- Function 1: Why my photos look blurry on Instagram
- Part two: How to set up blurry photos on Instagram
- Office iii: Tips nigh photo size and format when uploading to Instagram
Function 1. Why my photos await blurry on Instagram
The most commonly used social media platform that aids in providing information, entertainment, and interesting insiders nigh the life of dissimilar celebrities. The fun-oriented platform allows users to upload amazing content on their accounts. They can chat, face up time friends, and even do live sessions.
A common complaint from different Instagram users is that the photo quality changes when you upload a photo. The photos generally become blurry later on upload. Only have you ever pondered on the reason why this happens? If not, then let'southward discuss few reasons why photos await blurry;
- File Size:
When uploading a photo on Instagram, the file size matters a lot. It does not problem the uploading process, but it does affect the photo quality, and the image looks blurry. If the file size is over 1MB, then Instagram volition shrink it.
- Photo's Ratio:
If you are uploading an image with an incorrect attribute ratio, then Instagram will compress and ingather the photo. This manner, the photo will be of the standard size that is acceptable to upload, just it amercement the picture quality, and it looks blurry. The right aspect is four:5.
- File Format:
The default file format accepted by Instagram is JPEG (.jpg) extension. In example the user is uploading an image file in whatsoever format other than this format, then Instagram will covert the format to .jpg, and then the file will be uploaded. Hence, during the conversion, the file loses its quality.
- Device in Use:
Instagram is a mobile-based awarding, yet people also use it on other devices such as desktops, laptops, etc. Uploading photos from other devices volition definitely impairment and reduce the photo quality because the awarding is predominantly mobile-based.
Office 2. How to fix blurry photos on Instagram
The full of the fun platform is getting in trouble as photo results are afflicted by few factors, as discussed. People sometimes go bellyaching past the bad photo quality and that the image looks blurry, and this is a very common complaint seen amidst all Instagram users.
What people think when they see a blurry photograph is how to gear up blurry Instagram photos on Android but sadly, they don't have the answer because if they did, then the problem would have been resolved. And then, to assistance yous regarding how to prepare blurry photos on Instagram few guiding methods are attached in the coming section;
Method ane: Instagram Data Setting
Y'all can gear up the issue of blurry photos past adjusting settings on Instagram. You but have to turn off the data saving feature to get rid of blurry and low-quality images. Allow u.s. to guide you;
- Open the Instagram app and from the bottom right corner, tap on the profile icon.
- When your profile opens, become to 'More' by tapping on the iii horizontal lines in the top right corner.
- A side carte will open up after tapping, and from this bill of fare, select 'Settings' from the bottom right corner.

- Various setting options volition appear on the screen; you are requested to select 'Account' and then from the next screen select 'Cellular Data Settings.'

- A new screen will appear that will have a toggle button on the right side of the screen; in front of 'Data Saver,' you lot have to tap on information technology to turn it off.

Method ii: Maximize Phones Camera Quality
Another unique solution to blurry images and to prevent huge quality loss is to maximize your telephone'due south camera quality. Allow us to tell you how information technology'south done;
- Open up your phone's default Camera Awarding.
- You lot at present have to open the settings menu of the camera app past tapping on the 'Gear icon.'

- You will see the option of 'Pic Size' in the tiptop portion of the settings menu; click on it.

- From this screen, select the biggest size resolution for the prototype. You tin can also prepare the video size from here by simply tapping on it and selecting the maximum resolution size.
Method 3: Wondershare Repairit File Repair Tool
Not everyone is enlightened of this magical tool. Those who already are, are in heaven because they can repair the photo inside minutes, and those who take never heard about it, attached their seat belts because the roller coaster of Wondershare Repairit is about to first. The offline tool to repair photos is splendid yet very piece of cake to utilize. Let us show you its steps;
Step 1: Load File to Repair
The commencement and important step the user needs to do is to download and install the tool, and whenever yous have to repair a photograph, just launch it.
Once the tool is opened, y'all take to click on the 'Add together' push that is visible in the center of the screen. This button will permit y'all to cull a local file from Mac or Windows system and load it onto the software to repair.

Step 2: Offset Repair
After y'all have selected the files you want the software to repair, just click on the 'Repair' push to let the software start the repairing process. An indicator will exist visible in the bottom left corner, showing the user the progress of the repair procedure.

The process will accept few minutes to complete. Remember one thing, do not shut the application during the repair procedure.
Footstep 3: Restore
When the process is completed, the system will show the user a list of all the repaired files. The user is at present supposed to select the files they desire to restore. As presently every bit the user is satisfied with the selected flies to restore, just click on the 'Save Repaired Files' button and let the software save the files.
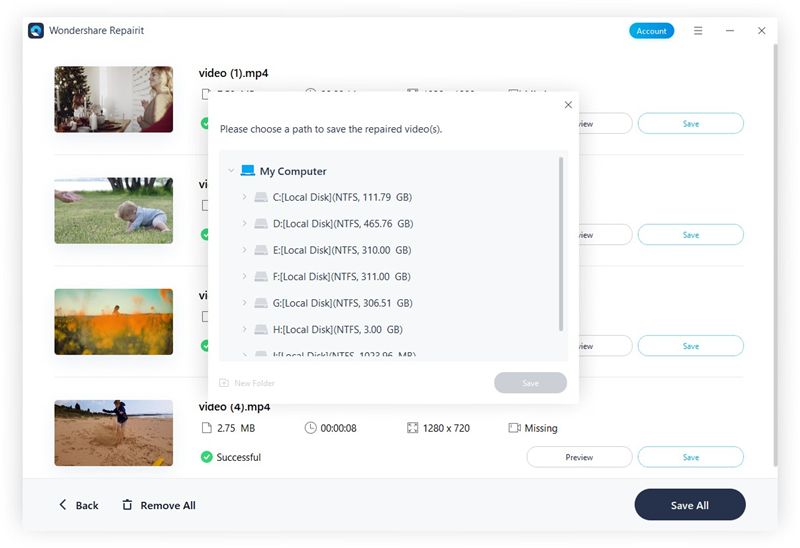
But select your desired location to save the repaired files.
Part 3. Tips near photo size and format when uploading to Instagram
To avoid whatever problem when uploading a photo on Instagram, it's essential to bank check all the facts and factors that are required for upload. Things like photo size, file format, aspect ratio, and other minute elements that people by and large ignore and don't bother but that cost them later.
Some tricks and tips that helped people escape from all the uploading issues and become more likes will be shared then that you tin too get the about benefit similar other people have been getting;
- The photo should take at to the lowest degree the size of 1080px, on the shortest side.
- You tin select the combination of photo size as 1:1 Square.
- Another aspect ratio commonly used is 4:5 The portrait. It's platonic image size is 1080px by 1350px.
- People also prefer using the Landscape manner as ane.91:1. The platonic image size for such a manner is 1080px by 608px.
- The best file format that Instagram supports is JPEG (.jpg) format as it has a high resolution with a smaller file size.
- Subsequently JPEG, the 2nd-best file format for Instagram is PNG.
Any more related articles:
- Workable tips to fix corrupted images online
- Ultimate Solutions to Excel Crashing and Value Errors
- Pixelated Images Solution
Decision:
Providing the user with the best information, implementable solutions, and beneficial tips that will help the user to upload improve quality images. Users tin enjoy the amazing features offered past Instagram without any hurdle.
People Also Ask
-
How practise I change the upload quality on Instagram?
Multiple tips have been discussed in the above sections guiding for better upload quality.
-
How do I brand my Instagram pictures clear?
Past avoiding all the factors that crusade an image to get blurry and also by post-obit the solutions provided in the article, users can make Instagram pictures clear.
-
How do you recover permanently deleted Instagram?
According to Instagram policy, a mistakenly disabled business relationship past Instagram or a user can exist recovered, just a permanently deleted account cannot exist recovered.
-
Tin can you recover deleted Instagram videos?
Yes, deleted Instagram videos can be recovered within 30 days of deleting.
Source: https://recoverit.wondershare.com/photo-recovery/how-to-fix-blurry-pictures-on-instagram.html
0 Response to "I Take Good Photos on My Phone but When I Upload to Instagram They Appear Pixilated"
Post a Comment